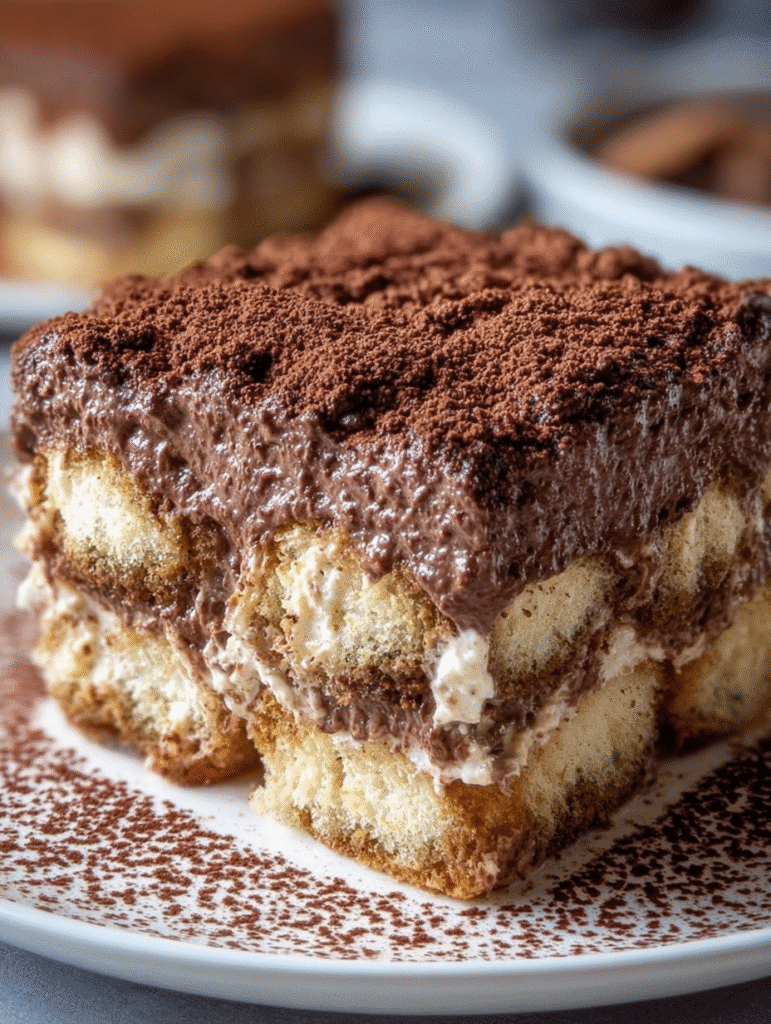
Introduction to No-Bake Chocolate Tiramisu Dream
Welcome to my kitchen, where today I’m excited to share my No-Bake Chocolate Tiramisu Dream! This dessert is like a warm hug on a plate, perfect for those days when you crave something sweet but don’t want to spend hours in the kitchen. It’s a delightful blend of rich chocolate and coffee, making it an indulgent treat for any occasion. Whether you’re looking to impress guests or simply want to treat yourself, this no-bake wonder is your go-to solution. Trust me, once you try it, you’ll be dreaming of it long after the last bite!
Why You’ll Love This No-Bake Chocolate Tiramisu Dream
This No-Bake Chocolate Tiramisu Dream is a game-changer for dessert lovers! It’s incredibly easy to whip up, taking just 30 minutes of your time. Plus, there’s no baking involved, so you can skip the oven and the heat. The combination of creamy mascarpone and rich chocolate creates a taste sensation that’s simply irresistible. Perfect for busy days or special gatherings, this dessert will leave everyone asking for seconds!
Ingredients for No-Bake Chocolate Tiramisu Dream
Gathering the right ingredients is the first step to creating your No-Bake Chocolate Tiramisu Dream. Here’s what you’ll need:
- Ladyfinger cookies (savoiardi): These light, airy cookies are the backbone of tiramisu, soaking up the coffee flavor beautifully.
- Strong coffee or espresso: Brewed to perfection, this adds a rich depth to the dessert. For a stronger kick, espresso is your best friend!
- Coffee liqueur (optional): A splash of Kahlúa or Baileys can elevate the flavor, adding a delightful twist. Feel free to skip it if you prefer a non-alcoholic version.
- Mascarpone cheese: This creamy Italian cheese is essential for that luscious texture. It’s what makes the tiramisu so indulgent!
- Heavy cream: Whipping this up gives the dessert its light and fluffy consistency. Make sure it’s chilled for the best results.
- Powdered sugar: This sweetens the mascarpone mixture without adding graininess, ensuring a smooth finish.
- Dark chocolate: Melted and mixed in, it brings a rich chocolate flavor that pairs perfectly with coffee.
- Vanilla extract: A splash of this adds warmth and depth to the overall flavor profile.
- Unsweetened cocoa powder: For dusting on top, it adds a beautiful finish and a hint of bitterness to balance the sweetness.
- Chocolate shavings or curls (optional): These are a lovely garnish that adds a touch of elegance and extra chocolatey goodness.
For exact measurements, check the bottom of the article where you can find everything listed for easy printing. Happy cooking!

How to Make No-Bake Chocolate Tiramisu Dream
Prepare the Coffee Mixture
Start by brewing a strong cup of coffee or espresso. Let it cool down to room temperature. If you’re feeling adventurous, stir in a splash of coffee liqueur like Kahlúa or Baileys for an extra kick. This step is crucial, as the coffee mixture will soak into the ladyfingers, infusing them with rich flavor. Just remember, don’t let the coffee get too cold; you want it to be perfect for dipping!
Make the Chocolate Cream
In a large mixing bowl, beat the softened mascarpone cheese with powdered sugar and vanilla extract until smooth and creamy. In another bowl, whip the chilled heavy cream until soft peaks form. Gently fold the whipped cream into the mascarpone mixture, being careful not to deflate it. Finally, stir in the melted dark chocolate until everything is well combined. This chocolate cream is the heart of your No-Bake Chocolate Tiramisu Dream, so make sure it’s luscious and velvety!
Assemble the Tiramisu
Now comes the fun part! Quickly dip each ladyfinger into the coffee mixture, ensuring they’re soaked but not soggy. Arrange a layer of these dipped ladyfingers at the bottom of your dish. Spread half of the chocolate cream over the ladyfingers, smoothing it out evenly. Repeat with another layer of dipped ladyfingers and finish with the remaining chocolate cream. It’s like building a delicious tower of joy!
Chill & Serve
Cover your assembled tiramisu and pop it in the fridge for at least four hours, but overnight is best. This chilling time allows the flavors to meld beautifully. When you’re ready to serve, dust the top generously with cocoa powder and add chocolate shavings for that extra touch. Slice, serve, and watch everyone’s eyes light up with delight!
Tips for Success
- Use fresh ingredients for the best flavor, especially the coffee and mascarpone.
- Don’t soak the ladyfingers too long; a quick dip is all you need!
- Chill the dessert overnight for maximum flavor and creaminess.
- Feel free to adjust the sweetness by adding more or less powdered sugar.
- Experiment with different liqueurs for unique flavor profiles!
Equipment Needed
- Mixing bowls: Use a large bowl for the mascarpone mixture and a smaller one for whipping cream. Any size will do!
- Electric mixer: A hand mixer works great, but a whisk can also do the job if you’re feeling strong!
- Spatula: Essential for folding and spreading the chocolate cream smoothly.
- Square dish: A 9×9 inch dish is perfect, but any similar-sized dish will work.
- Measuring cups and spoons: Handy for precise ingredient measurements.
Variations
- Vegan Version: Substitute mascarpone with a vegan cream cheese and use coconut cream instead of heavy cream for a dairy-free delight.
- Gluten-Free Option: Use gluten-free ladyfingers or even sponge cake to make this dessert suitable for gluten-sensitive friends.
- Flavor Twists: Add a hint of orange zest or almond extract to the chocolate cream for a unique flavor profile.
- Fruit Layer: Incorporate layers of fresh berries or banana slices between the ladyfingers for a fruity twist.
- Nutty Delight: Fold in crushed nuts like hazelnuts or almonds into the chocolate cream for added texture and flavor.
Serving Suggestions
- Pair your No-Bake Chocolate Tiramisu Dream with a rich espresso or a creamy cappuccino for a delightful coffee experience.
- Serve with fresh berries on the side for a pop of color and a refreshing contrast.
- Garnish with mint leaves for a touch of elegance and a burst of freshness.
- Consider a drizzle of chocolate sauce on the plate for an extra indulgent presentation.
FAQs about No-Bake Chocolate Tiramisu Dream
Can I make No-Bake Chocolate Tiramisu Dream ahead of time?
Absolutely! In fact, making it a day in advance is ideal. The flavors meld beautifully overnight, making each bite even more delicious. Just remember to keep it covered in the fridge!
What can I substitute for mascarpone cheese?
If you can’t find mascarpone, cream cheese mixed with a bit of heavy cream can work as a substitute. It won’t be quite the same, but it’ll still be creamy and tasty in your No-Bake Chocolate Tiramisu Dream.
Is it possible to make this dessert without coffee?
Yes! You can replace the coffee with a strong brewed tea or even a chocolate milk mixture. Just keep in mind that it will change the flavor profile of your No-Bake Chocolate Tiramisu Dream.
How long does the No-Bake Chocolate Tiramisu Dream last in the fridge?
This dessert can last up to 3 days in the fridge if stored properly. Just make sure it’s covered to keep it fresh and delicious!
Can I freeze No-Bake Chocolate Tiramisu Dream?
While it’s best enjoyed fresh, you can freeze it for up to a month. Just thaw it in the fridge overnight before serving. The texture may change slightly, but it will still be a delightful treat!
Final Thoughts
Creating this No-Bake Chocolate Tiramisu Dream is more than just making a dessert; it’s about crafting a moment of joy. Each layer tells a story, from the rich coffee-soaked ladyfingers to the velvety chocolate cream. It’s a treat that brings people together, whether it’s a cozy family dinner or a festive gathering with friends. The smiles and satisfied sighs that follow each bite are truly priceless. So, roll up your sleeves, embrace the process, and indulge in this delightful creation. Trust me, it’s a sweet escape you’ll want to revisit time and time again!
Print
No-Bake Chocolate Tiramisu Dream: Indulge Today!
- Total Time: 4 hours 30 minutes
- Yield: 8 servings 1x
- Diet: Vegetarian
Description
A delightful and indulgent no-bake dessert that combines the rich flavors of chocolate and coffee in a creamy tiramisu.
Ingredients
- 1 package (about 24–28) ladyfinger cookies (savoiardi)
- 1 ½ cups strong coffee or espresso, cooled
- 2 tbsp coffee liqueur (optional, e.g., Kahlúa or Baileys)
- 250 g (9 oz) mascarpone cheese, softened
- 1 cup heavy cream, chilled
- ½ cup powdered sugar
- 150 g (5 oz) dark chocolate, melted and cooled
- 1 tsp vanilla extract
- Unsweetened cocoa powder (for dusting)
- Chocolate shavings or curls (optional)
Instructions
- Prepare the Coffee Mixture: Brew espresso or strong coffee and let cool. Stir in liqueur (if using).
- Make the Chocolate Cream: In a large bowl, beat mascarpone, powdered sugar, and vanilla until smooth. In another bowl, whip heavy cream until soft peaks form. Fold whipped cream into mascarpone mixture. Stir in melted chocolate until smooth and creamy.
- Assemble the Tiramisu: Quickly dip ladyfingers into the coffee mixture (do not soak). Arrange a layer of dipped ladyfingers at the bottom of a square dish. Spread half of the chocolate cream over the ladyfingers. Repeat with another layer of dipped ladyfingers and top with remaining cream.
- Chill & Serve: Cover and refrigerate for at least 4 hours (preferably overnight) for flavors to meld. Just before serving, dust generously with cocoa powder and add chocolate shavings.
Notes
- For a stronger coffee flavor, use espresso.
- Allowing the tiramisu to chill overnight enhances the flavors.
- Feel free to adjust the amount of coffee liqueur based on your preference.
- Prep Time: 30 minutes
- Cook Time: 0 minutes
- Category: Dessert
- Method: No-Bake
- Cuisine: Italian
Nutrition
- Serving Size: 1 slice
- Calories: 350
- Sugar: 25g
- Sodium: 100mg
- Fat: 25g
- Saturated Fat: 15g
- Unsaturated Fat: 5g
- Trans Fat: 0g
- Carbohydrates: 30g
- Fiber: 2g
- Protein: 5g
- Cholesterol: 80mg


