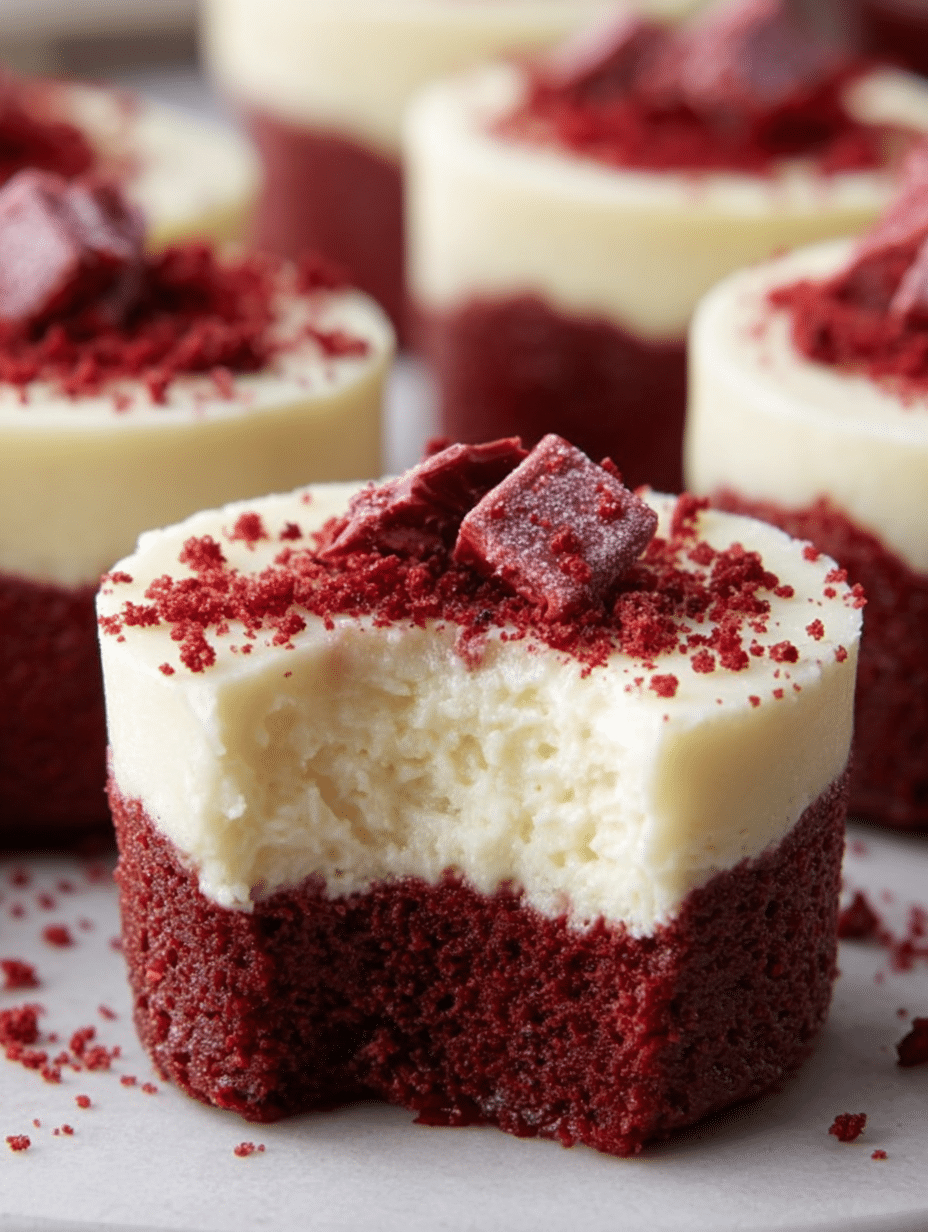
Introduction to Red Velvet Cheesecake Mini Brownies
Welcome to the delightful world of Red Velvet Cheesecake Mini Brownies! If you’re anything like me, you know that life can get busy, and sometimes you just need a quick, sweet escape. These mini brownies are the perfect solution, combining the rich flavors of red velvet cake with the creamy goodness of cheesecake in a bite-sized treat. Whether you’re looking to impress guests at a gathering or simply indulge in a little self-care, this recipe is sure to bring joy to your day. Let’s dive into this delicious adventure together!
Why You’ll Love This Red Velvet Cheesecake Mini Brownies
These Red Velvet Cheesecake Mini Brownies are a dream come true for any dessert lover. They’re incredibly easy to whip up, making them perfect for busy days or last-minute gatherings. The combination of rich chocolatey red velvet and creamy cheesecake creates a flavor explosion that’s hard to resist. Plus, their mini size means you can enjoy a sweet treat without the guilt. Trust me, one bite and you’ll be hooked!
Ingredients for Red Velvet Cheesecake Mini Brownies
Gathering the right ingredients is the first step to creating these delightful Red Velvet Cheesecake Mini Brownies. Here’s what you’ll need:
- Unsalted butter: This adds richness and moisture to the brownies. Melt it for a smooth batter.
- Granulated sugar: Sweetens the brownies and helps create that lovely texture.
- Eggs: Essential for binding the ingredients together and adding fluffiness.
- Vanilla extract: A splash of this adds a warm, aromatic flavor that enhances the overall taste.
- White vinegar: This might sound odd, but it reacts with the baking soda to create a tender crumb.
- Red food coloring: The star of the show! It gives the brownies their signature vibrant hue.
- All-purpose flour: The backbone of the brownies, providing structure and stability.
- Unsweetened cocoa powder: Adds a rich chocolate flavor that complements the red velvet beautifully.
- Salt: Just a pinch enhances the sweetness and balances the flavors.
- Cream cheese: The key ingredient for the cheesecake layer, making it creamy and luscious.
- Additional granulated sugar: Sweetens the cheesecake layer, ensuring it’s just as delightful as the brownie base.
- Extra egg: This helps the cheesecake layer set perfectly.
- More vanilla extract: Because you can never have too much vanilla!
- Red velvet crumbs or brownie bites: Optional, but they make for a gorgeous garnish that adds texture and flair.
For exact measurements, check the bottom of the article where you can find everything listed for easy printing. Happy baking!
How to Make Red Velvet Cheesecake Mini Brownies
Now that we have our ingredients ready, let’s dive into the fun part: making these Red Velvet Cheesecake Mini Brownies! Follow these simple steps, and you’ll be on your way to a delicious treat that will impress everyone.
Step 1: Preheat the Oven and Prepare the Molds
First things first, preheat your oven to 350°F (175°C). This step is crucial because it ensures even baking. While the oven warms up, line a muffin tin with parchment liners or use mini cheesecake molds. This will make it easier to remove the brownies later. Trust me, you don’t want to wrestle with stuck brownies!
Step 2: Mix the Red Velvet Batter
In a large bowl, whisk together the melted butter and sugar until smooth. It should look glossy and inviting. Next, add in the eggs, vanilla extract, white vinegar, and red food coloring. Mix until everything is well combined. Now, sift in the flour, cocoa powder, and salt. Stir gently until just combined. Be careful not to overmix; we want a tender brownie!
Step 3: Prepare the Cheesecake Layer
In another bowl, beat the softened cream cheese until it’s creamy and smooth. Add the sugar, egg, and vanilla extract, mixing until everything is well blended. This cheesecake layer should be velvety and luscious, ready to complement the rich red velvet base. If it’s not smooth, keep mixing until it is. You want it to be as dreamy as it sounds!
Step 4: Assemble the Mini Brownies
Now comes the fun part! Spoon about 2 tablespoons of the red velvet batter into each mold, spreading it evenly. Then, pour the cheesecake mixture over the red velvet layer, filling each cup nearly to the top. The layers should look beautiful together, like a delicious sunset. Don’t worry if they look a bit messy; they’ll bake up perfectly!
Step 5: Bake to Perfection
Place your muffin tin in the preheated oven and bake for 18–22 minutes. Keep an eye on them! You want the cheesecake to be just set, with a slight jiggle in the center. If you overbake, the texture will be off. A toothpick inserted into the brownie part should come out clean, but the cheesecake can still be a bit soft.
Step 6: Cool and Chill
Once baked, remove the mini brownies from the oven and let them cool completely in the tin. This is important because it allows the flavors to meld together. After they’ve cooled, refrigerate them for at least 2 hours. Chilling helps the cheesecake layer firm up, giving you that perfect creamy texture. Trust me, the wait is worth it!
Tips for Success
- Make sure your cream cheese is softened for easy mixing; it should be at room temperature.
- Don’t skip the chilling step; it’s essential for achieving that perfect cheesecake texture.
- Use high-quality red food coloring for vibrant color; it makes a big difference!
- Keep an eye on the baking time; every oven is different, and you want them just right.
- For a fun twist, try adding chocolate chips to the red velvet batter!
Equipment Needed
- Muffin tin: Essential for baking mini brownies. You can also use mini cheesecake molds if you have them.
- Mixing bowls: A couple of medium-sized bowls will do the trick.
- Whisk: Perfect for mixing ingredients smoothly; a fork works in a pinch!
- Measuring cups and spoons: Accurate measurements are key for baking success.
- Spatula: Great for scraping down the sides of bowls and spreading batter evenly.
Variations
- Gluten-Free: Substitute all-purpose flour with a gluten-free blend to make these brownies suitable for gluten-sensitive friends.
- Chocolate Lovers: Add chocolate chips to the red velvet batter for an extra chocolatey kick!
- Nutty Twist: Incorporate chopped walnuts or pecans into the brownie layer for added crunch and flavor.
- Cheesecake Swirl: Instead of layering, swirl the cheesecake mixture into the red velvet batter for a marbled effect.
- Vegan Option: Use flax eggs and a dairy-free cream cheese alternative to create a vegan-friendly version of these mini brownies.
Serving Suggestions
- Pair these Red Velvet Cheesecake Mini Brownies with a scoop of vanilla ice cream for a delightful contrast.
- Serve with a dollop of whipped cream and fresh berries for a pop of color.
- For drinks, a rich coffee or a glass of cold milk complements the flavors beautifully.
- Present them on a decorative platter, garnished with mint leaves for an elegant touch.
FAQs about Red Velvet Cheesecake Mini Brownies
Can I make these Red Velvet Cheesecake Mini Brownies ahead of time?
Absolutely! These mini brownies can be made a day in advance. Just store them in the refrigerator after they’ve cooled completely. This actually enhances the flavors!
What can I use instead of cream cheese?
If you’re looking for a substitute, you can use mascarpone cheese or a dairy-free cream cheese alternative. Both will give you a creamy texture, perfect for the cheesecake layer.
How do I store leftover brownies?
Store any leftover Red Velvet Cheesecake Mini Brownies in an airtight container in the refrigerator. They’ll stay fresh for up to five days, but I doubt they’ll last that long!
Can I freeze these mini brownies?
Yes, you can freeze them! Just wrap each brownie tightly in plastic wrap and place them in a freezer-safe container. They’ll keep well for up to three months. Thaw them in the fridge before serving.
What’s the best way to serve these brownies?
For the best experience, serve them chilled. You can also top them with whipped cream or a sprinkle of red velvet crumbs for an extra touch of elegance!
Final Thoughts
Creating these Red Velvet Cheesecake Mini Brownies is more than just baking; it’s about crafting joy in every bite. The vibrant red color and creamy cheesecake layer bring a smile to anyone who tries them. Whether you’re celebrating a special occasion or simply treating yourself, these mini brownies are sure to impress. I love how they combine the best of both worlds—rich red velvet and luscious cheesecake—into a delightful, bite-sized treat. So, roll up your sleeves, gather your ingredients, and let the magic happen in your kitchen. You won’t regret it!
Print
Red Velvet Cheesecake Mini Brownies Recipe You’ll Love!
- Total Time: 2 hours 42 minutes
- Yield: 12 mini brownies 1x
- Diet: Vegetarian
Description
Deliciously rich and creamy Red Velvet Cheesecake Mini Brownies that combine the flavors of red velvet cake and cheesecake in a bite-sized treat.
Ingredients
- ½ cup (113 g) unsalted butter, melted
- 1 cup (200 g) granulated sugar
- 2 large eggs
- 1 tsp vanilla extract
- 1 tsp white vinegar
- 1 tbsp red food coloring
- ¾ cup (95 g) all-purpose flour
- 2 tbsp unsweetened cocoa powder
- ¼ tsp salt
- 8 oz (225 g) cream cheese, softened
- ⅓ cup (65 g) granulated sugar
- 1 large egg
- ½ tsp vanilla extract
- Red velvet crumbs (for garnish)
- Red velvet chunks or brownie bites (for garnish)
Instructions
- Preheat oven to 350°F (175°C). Line a muffin tin with parchment liners or use mini cheesecake molds.
- In a bowl, whisk together melted butter and sugar until smooth.
- Add eggs, vanilla, vinegar, and food coloring. Mix well.
- Sift in flour, cocoa powder, and salt. Stir until just combined.
- Spoon about 2 tbsp batter into each mold/cup, spreading evenly.
- In another bowl, beat cream cheese, sugar, egg, and vanilla until creamy and smooth.
- Pour over the red velvet layer, filling each cup nearly to the top.
- Bake for 18–22 minutes, until the cheesecake is just set (slight jiggle in the center is fine).
- Cool completely, then refrigerate for at least 2 hours to firm up.
- Once chilled, carefully remove from molds.
- Top with red velvet crumbs and brownie chunks for garnish.
- Serve chilled for best texture.
Notes
- Ensure the cream cheese is softened for easy mixing.
- For a deeper red color, adjust the amount of food coloring as desired.
- These brownies can be stored in the refrigerator for up to 5 days.
- Prep Time: 20 minutes
- Cook Time: 22 minutes
- Category: Dessert
- Method: Baking
- Cuisine: American
Nutrition
- Serving Size: 1 mini brownie
- Calories: 200
- Sugar: 15g
- Sodium: 150mg
- Fat: 10g
- Saturated Fat: 6g
- Unsaturated Fat: 3g
- Trans Fat: 0g
- Carbohydrates: 25g
- Fiber: 1g
- Protein: 3g
- Cholesterol: 50mg


